So, you want to start your first blog. You are at the right place. This article will step-by-step guide you on how to start your first WordPress blog. Before we start, let me make it very clear that even if you don’t have any technical knowledge, you will still be able to start your first blog with the help of this guide.
From picking up and buying a new domain name to choosing and setting up web hosting for your new blog, this article will cover each and every step in detail so that you don’t get stuck anywhere throughout the process.
Before we move ahead with this article, let me introduce myself. I am Raman Sharma, a technology blogger and WordPress expert. I have been blogging with WordPress for more than 12 years. With over 12 years of experience in WordPress and blogging, I can assure you that reading this article till the end will make you able to start your new WordPress blog without any other support.
Start Your First WordPress Blog in 6 Steps [Complete Guide]
So, let’s start with this 10-step guide to start your first WordPress blog. If you read all these 10 steps thoroughly, I can guarantee you that you will be able to start your WordPress blog by yourself without any other guidance.
Step 1. Decide a Niche of Your Expertise
Blogging these days is not the same as it used to be years ago. Now, only if you are an expert in something, you should start writing on that. Otherwise, your blog posts are not going to get any views.
Google’s algorithm is now strong enough to detect unhelpful content and demote it. So, the very first step to start your WordPress blog is to decide on a niche in which you have the authority to share information.
One important thing you should keep in mind when choosing a niche is that the narrower your niche, the more impactful your content will be. So, choose a niche with a complete presence of mind because choosing the wrong niche will waste your money, efforts, and time.
Step 2. Register a Domain Name
Now that you have decided the niche for your blog, it’s time to give it a name. The domain name is the address of your blog on the internet, such as yourblog.com. Think of a small yet meaningful name for your new blog and look for its availability for registering it as your domain name. Let me guide you on how can you register a domain name.
For domain name registration, there are many registrars available these days. One of the biggest names in the industry is GoDaddy. So, check out the steps below to register a domain name for your new blog.
- Go to the GoDaddy.com website, type any domain name that you wish to grab to check its availability, and hit Enter.
- If your searched domain name is available, you will see a button that says Make It Yours. If not, you will see a section that says Domain Taken. So, keep searching different versions of your domain name until you find an exact match.
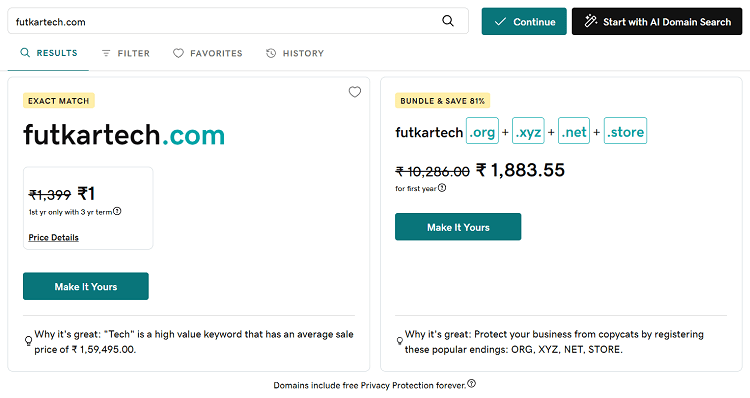
- Once, you find an available domain name relevant to your niche, just add it to the cart by clicking the Make It Yours button. You can anytime buy it from the cart using your credit/debit card.
That’s all about registering a domain name. Make sure that you will need a GoDaddy account for registering a domain name with them. If you don’t have an account with GoDaddy, create one. You can also log in using your Google or Facebook account.
Step 3. Choose a Web Hosting Provider
A web hosting provider is equally important like your blog’s domain name. Without both of them, you can’t launch your new blog. So, once you have registered your blog’s domain name, it’s time to choose a web hosting provider.
Most web hosting providers also offer a free domain name along with their web hosting package. So, if that’s the case with your hosting provider, you can skip the 2nd step and just buy the domain and hosting from one place.
Shared hosting plans are the best fit for new blogs. I will recommend you go with the managed WordPress hosting package. Many web hosting providers including Hostinger, Bluehost, WPX Hosting, etc. provide managed hosting solutions at the most affordable prices. However, the price of the starter plans of WPX Hosting can be a bit high as compared to Hostinger, but you get better solutions with WPX.
Step 4. Setup DNS Records Carefully
Now that you have registered your blog’s domain name and signed up with a web hosting provider, it’s time to set up the DNS records to connect your domain to the web hosting server.
Domain Name System (DNS) records are used to connect your domain name with your web hosting server so that website visitors can find your website when they type your domain name.
So, what you need to do first is to get the nameservers from your web hosting provider. They look like ns1.yourhosting.com and ns2.yourhosting.com. Once you get the nameservers from your web host, log in to your domain registrar, look for the DNS Management section, and change the nameservers.

After, you have successfully changed the nameservers, look for the DNS records area to see if the A records pointing to your web hosting server IP are already configured or not. If not, you will have to configure it. You should also consult with your hosting provider support in this regard because different web hosts might have different ways of setting up DNS records.
Step 5. Install WordPress & Create Admin Credentials
If you have successfully set up the DNS records after buying your domain name and web hosting server, it means you are almost done with the most technical stuff in creating a blog. Now, as you are about to create a WordPress blog, it’s time to install WordPress and set up your admin credentials to start working on your very new blog.
All modern web hosting providers like Hostinger made the process of installing WordPress and setting up the admin credentials very easy. It’s like creating a new social media account.
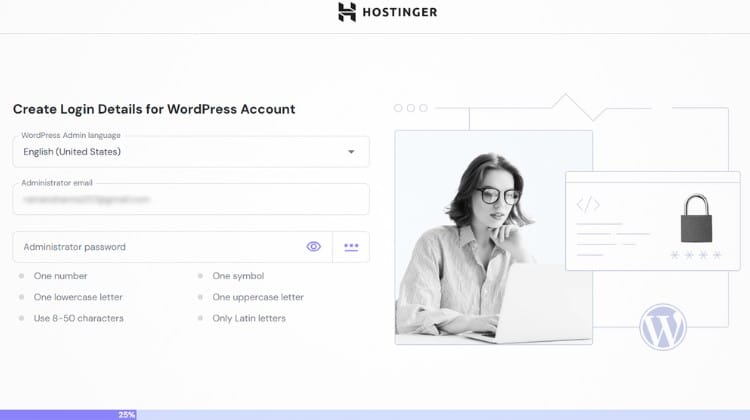
Just keep clicking the Next button and follow the on-screen instructions. It’s that simple. Still, if you face any difficulty in setting up WordPress for your new blog, you can always seek support from your hosting provider in this regard.
Step 6. Set up your New WordPress Blog
Now, when you have installed the WordPress and successfully created the admin credentials, it’s time to set up your new WordPress blog before creating your first blog post.
Start by setting up a Site Title and Tagline for your new WordPress blog. To do so, just log in to your WordPress dashboard and go to Settings > General. Here, you can set up a Site Title, Tagline, and Site Icon for your new WordPress blog.
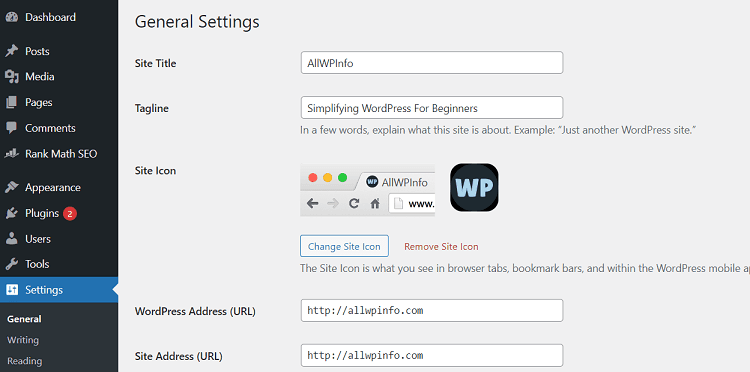
Now, another important thing to set up before creating a first blog post is permalinks. Just navigate to Settings > Permalinks and choose a desired permalinks structure for your links. We are using the “Post Name” structure for our blog’s permalinks.
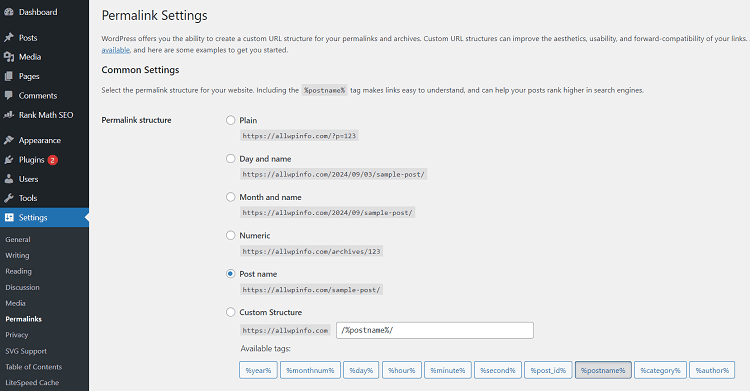
After this, you should install a fast-loading WordPress theme for your blog and some must-have WordPress plugins like an SEO plugin, caching plugin, etc. to start your blogging journey.
Conclusion
That’s all about starting your first WordPress blog. I am sure after reading this blog post till the end, you will be able to create your first WordPress blog from scratch. Still, if you have any doubts, I am always available to help you throughout your blogging journey.
You can either leave a comment on this post or directly reach out to me at [email protected]. Remember a mantra to succeed in blogging in 2024, just focus on writing original and highly helpful content to attract visitors to your new blog.
![5 Best Managed WordPress Hosting Providers [Tested] The best managed WordPress hosting providers.](https://allwpinfo.com/wp-content/uploads/2024/11/managed-wordpress-hosting-providers.webp)

