If you are running a WordPress website or blog and want to make a sidebar widget sticky or floating, it’s the easiest task I ever did. Just because of the ease of adding new functionalities to WordPress websites through plugins, I use WordPress CMS for all of my websites including AllWPInfo.com.
So, whether you want to increase the visibility of a sidebar widget or just want to improve your website navigation by floating a widget in the sidebar, you can easily make it possible without writing a single line of code.
In this blog post, I am going to share with you one of my favorite WordPress plugins that will help you make a sidebar widget sticky floating in WordPress very effortlessly. Let me guide you step by step!
Make a Sidebar Widget Sticky Using Fixed Widget Plugin
As the name suggests, this plugin lets you make a sidebar widget fixed. This is the easiest approach to make a sidebar widget sticky or floating in WordPress blogs or websites. I have tried this plugin on almost all my websites and it interestingly improved the user experience.
The thing that makes this plugin trustworthy is the company behind it. Advanced Ads is one of the popular ad management plugins available on WordPress.org and this Fixed Widget plugin is developed by the developers of Advanced Ads.
Install Fixed Widget Plugin
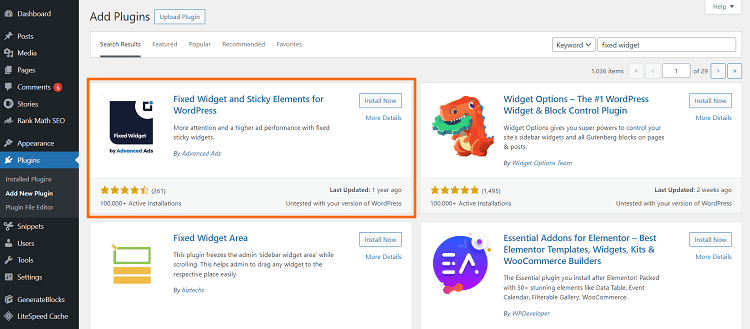
First of all, you need to install the Fixed Widget Plugin on your WordPress website. For that, you need to log in to your WordPress admin area and navigate to Plugins > Add New.
Here, you can either search for the plugin if it is available on the WordPress Plugins Repository or just upload it using the Upload Plugin button if you have downloaded the plugin file from its page on the WordPress Plugins Repository.
On the top of the search results, you will see the Fixed Widget and Sticky Elements for WordPress plugin by Advanced Ads. Click on the Install Now button to start installing it. Once installed, click on the Activate button to activate it. This is how you can install and activate the Fixed Widget plugin by Advanced Ads. Now, it’s time to configure it.

Configure the Fixed Widget Plugin
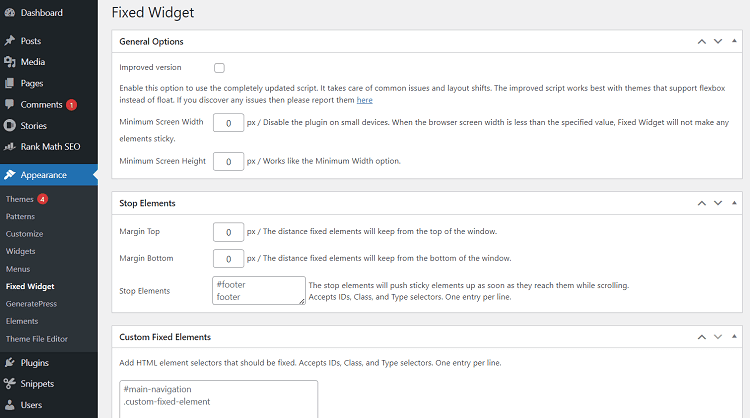
You can configure this plugin for the perfect appearance on the front end. To open the plugin settings, you need to go to Appearance > Fixed Widget.
Here, you will find all the required configuration settings like minimum screen width (used to disable the plugin on small screen sizes like smartphones, etc.), minimum screen height, and top and bottom margins. Also, the settings page allows you to make any custom elements fixed using element ID, class, or type selector.

Make a Sidebar Widget Sticky
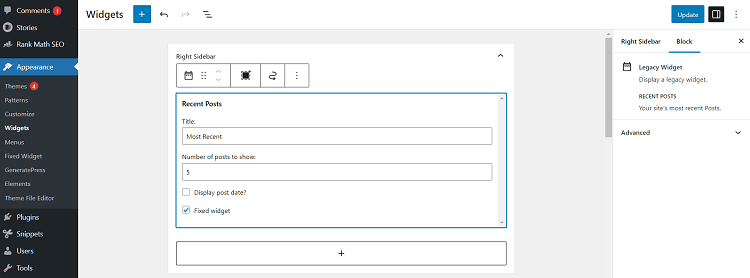
Well, let’s come to the point. This article is about making a sidebar widget sticky or floating. So, now, we are all set to make it possible. To do this, first of all, go to Appearance > Widgets from your WordPress dashboard.
On the Widgets pages, click on a Widget that you want to make sticky, and tick the Fixed Widget checkbox. That’s it. Hit the Update button to save your changes. According to your front-end appearance of the widget, you can play with the plugin settings as discussed above.

That’s all about making a sidebar widget sticky/floating on a WordPress blog. In addition to making sidebar widgets sticky, this plugin allows you to make any custom element sticky on your WordPress blog or website. From the plugin settings page, you just need to enter the element ID or class of that element inside the Custom Fixed Elements field box. It’s that simple.

![5 Best Managed WordPress Hosting Providers [Tested] The best managed WordPress hosting providers.](https://allwpinfo.com/wp-content/uploads/2024/11/managed-wordpress-hosting-providers.webp)


