Displaying the last updated date in WordPress blog posts is a very common practice these days. There are not only SEO benefits of displaying the last modified date instead of the published date in your blog posts but also it improves the user experience on your website.
I have been displaying the last updated date in almost all my WordPress blogs instead of the published date. So, this article is all about guiding you on how to display the last updated date of your posts in WordPress.
In this post, I will share with you the easiest method to display the last updated date in WordPress. If you are a beginner to WordPress without any high technical knowledge, this is the perfect method for you to display the last updated date of your posts in WordPress.
Here’s How to Easily Display the Last Updated Date in WordPress Blog Posts
Generally, almost all modern themes come with a built-in option for users to show the last updated date of posts instead of the published date. But, if your theme isn’t providing this feature, you can use the following method to display the last modified date by replacing the published date in your blog posts.
This is actually a plugin method I understand that many beginners will not want to mess around with adding pieces of code. So, without bombarding this post with a lot of plugins, I am just sharing with you the best plugin on the internet to display the last modified date in WordPress. The plugin is WP Last Modified Info. First, let’s see how to install this plugin.
Step 1. Install WP Last Modified Info Plugin
This is the easiest method to add the last modified date to your WordPress blog posts. This plugin has many customization options to set the updated date according to you. With this plugin, you can display the last updated date in your WordPress blog posts even without adding a single line of code.
To install the plugin, go to Plugins > Add New and search for WP Last Modified Info. Click on the Install Now button for the first appeared plugin by Sayan Datta. Alternatively, you can also download the plugin directly from WordPress.org, upload it, and install it to your WordPress website.

Step 2. Configure Post Settings to Display the Last Updated Date
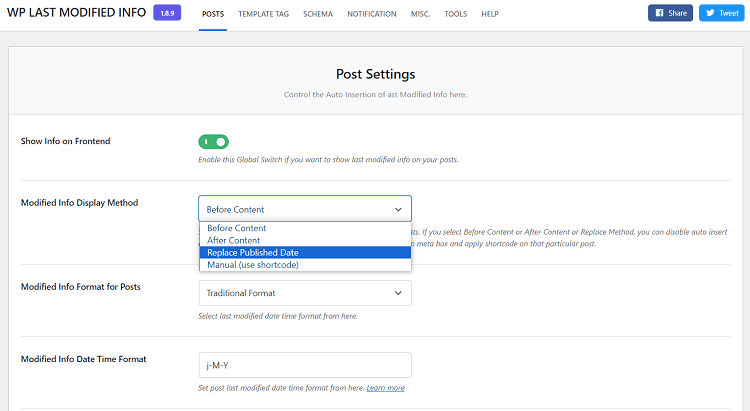
Once, it’s installed, Activate the plugin and go to Settings > WP Last Modified Info to set up the things. Here, on the Post Settings page, you will have to turn on the toggle first. Now, choose Replace Published Date as Modified Info Display Method. This will replace the published date with the last updated date. There are many other settings you can do like Modified Info Date Time Format, Modified Info Format for Posts, etc.
Step 3. Select Post Types and Disable on Archives
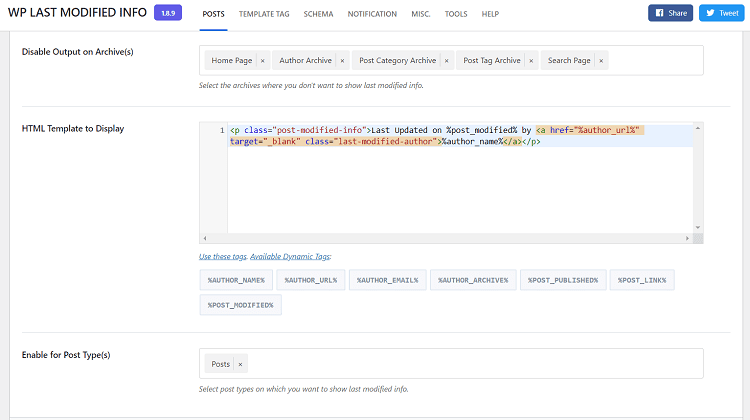
If you want to display the last updated date in only your blog posts, not the pages, you can enter Posts in the Enable for Post Types setting. You can also disable the output of this plugin on the Homepage and Archive pages Author archives, search page, etc. using Disable Output on Archive(s) setting.
The best part is that if you have basic HTML knowledge, you can customize how you want to show the last updated date in your posts using the HTML Template to Display field.
Display the Last Updated Date Using a Ready-to-Use Code Snippet in the WPCode Plugin [Alternate Method]
WPCode plugin is not directly made for displaying the last modified date in WordPress blog posts but for inserting code snippets without touching the theme files. But, the reason I am mentioning it here is it comes with some pre-made code snippets that are ready to use. One of those snippets is the Display the Last Updated Date snippet which can be used to display the last updated date in your WordPress blog posts. Let’s tell you how.
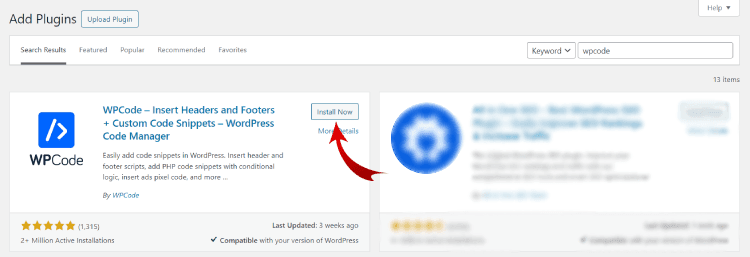
First of all, you need to install and activate the WPCode plugin. You can either install it directly from your WordPress admin area by navigating to Plugins > Add New and searching for the WPCode plugin or you can download it from WordPress.org and then install and activate.
Once the plugin is activated, go to Code Snippets > Add Snippet from the side menu of your WordPress dashboard. Here, you will see many ready-to-use code snippets. Search for the Last Updated Date snippet and click the Use Snippet button.
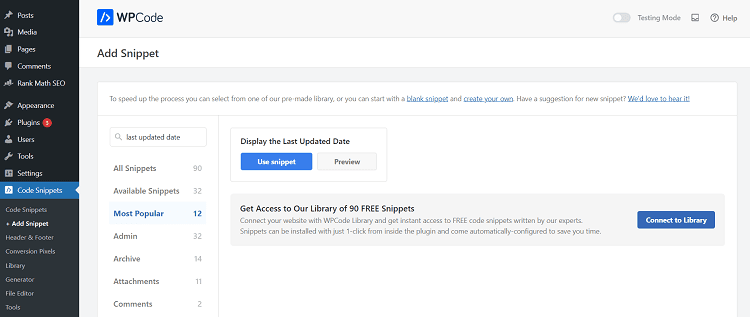
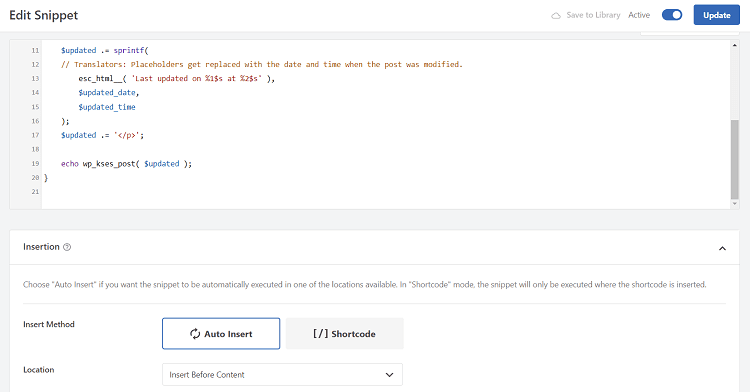
On the next screen, you will see the code preview, insert method, and the location where you want to show the last updated date. Once, everything is good to go, just turn the toggle on to activate the snippet and hit the Update button from the top right section of the screen.
Both of the above-mentioned plugins are the easiest methods to display the last updated date in your WordPress blog posts. I wrote this article specially for beginners who just don’t want to write a single line of code or edit any theme files.
Generally, almost all modern themes come with this feature inside the themes’ customization settings to display the last updated date. Using this feature, users can choose to display the last updated date in their blog posts instead of the published date with just a single click. But, if your theme is not having any such feature or customization setting, you can use any of the above-mentioned plugins to display the last modified date of your posts in WordPress.

![10 Must Have WordPress Plugins For Beginners [2026] Must have WordPress plugins](https://allwpinfo.com/wp-content/uploads/2023/10/must-have-wordpress-plugins.png)
![5 Best Managed WordPress Hosting Providers [Tested] The best managed WordPress hosting providers.](https://allwpinfo.com/wp-content/uploads/2024/11/managed-wordpress-hosting-providers.webp)
