Are you searching for some free WordPress plugins to turn your text into speech? If yes, then you are at the right place where you will get some good suggestions about the best text-to-speech WordPress plugins for your blog.
I have come across some websites and blogs in which an audio transcript of the whole article is also available so that visually impaired people can listen to the whole blog post.
Reading several web pages for long hours is impossible for everyone, especially those with visual disabilities or weak eyesight. If your content is also available in audio format, it can be listened to easily while traveling, during a workout, or while walking on the grass.
So, if you are a webmaster and running a website on WordPress, there are many text-to-speech WordPress plugins available on the internet that will make your job easy.
With the help of a text-to-speech (TTS) WordPress plugin, you can convert your blog content or text into speech or audio automatically without any effort. You don’t need to record each audio in your voice or follow any complex or lengthy process.
You can even utilize TTS plugins for making tutorials, stories, or podcasts with a written script.
TTS plugins have made text-to-speech conversion as simple as making tea. All you need to select the right plugin. I have tested over 8 TTS WordPress plugins but not all of them include a free plan. I filtered out the 4 free text-to-speech plugins for WordPress which will make your words alive by giving them a voice.
4 Free Text-to-Speech Plugins For WordPress
Check out the 4 free TTS plugins listed below for your WordPress website. These Plugins are simple to use and come with different voice styles. All of these plugins have a free version. If you get limited features, you can upgrade to the paid plan. Let’s check them out.
1. BeyondWords
BeyondWords is a text-to-speech WordPress plugin for those who are looking for a natural sound collection with an embedded player. There is a bonus point that you can modify your voice too. Tools are available to create, distribute, and monetize your audio.
It offers 550+ realistic voices in 140 languages to create natural-sounding audio for your text. It also includes a text-to-speech editor that lets you make changes to your text and fine-tune how the voice sounds.
Additionally, you can track how people interact with your audio content using its listener analytics. This helps you understand and improve your audience’s experience
Its free plan allows you to convert 5 articles per month. You can, however, upgrade to its paid plan which starts from $100/month.
How to Setup BeyondWords?
Login to your WordPress dashboard and go to Plugins > Add New. Look for the BeyondWords plugin and then install and activate it.
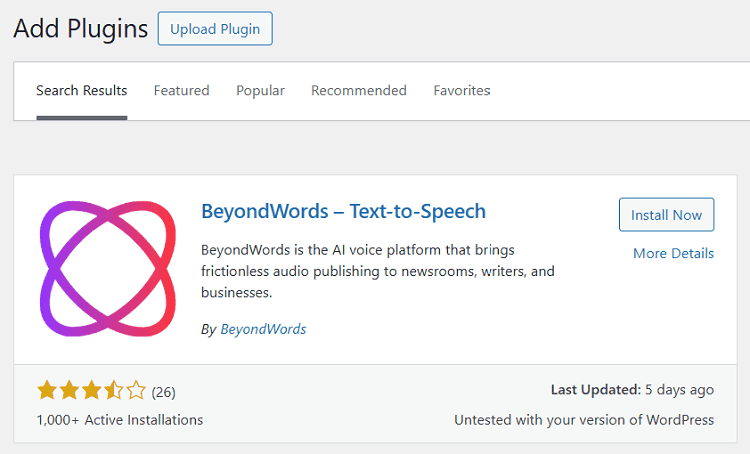
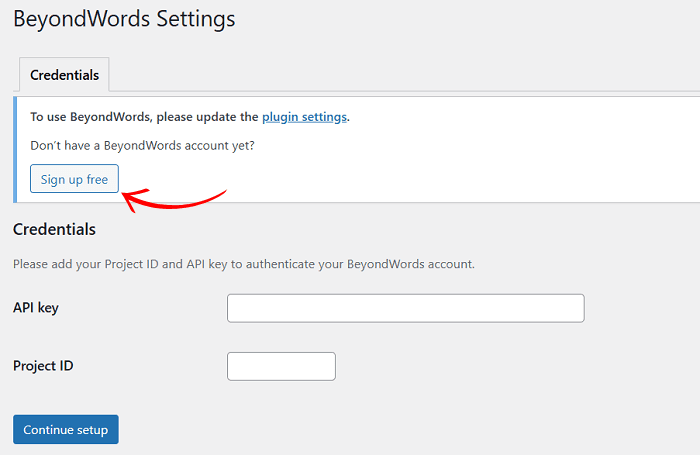
Now, go to Settings > BeyondWords. You will be asked for an API Key and Project ID. To get these things, you must first sign up to create a new account on the BeyondWords platform. Click the Sign up Free button.
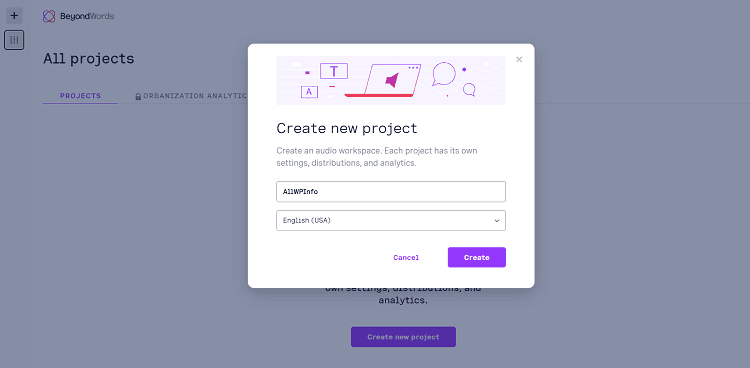
After Sign up, you will need to click on the Create New Project button to create your first project. It’s very easy to create new projects in the BeyondWords dashboard. It will ask you only the title of the project and your preferred language.
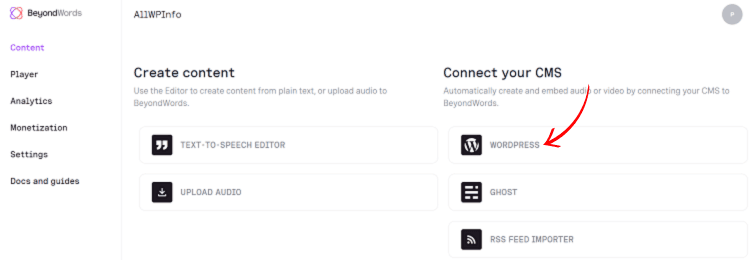
After the project is created, click on it. Click on WordPress below the Connect Your CMS section.
On the WordPress Settings page, you will find both, the API Key and the Project ID as requested by the plugin in the very first step.
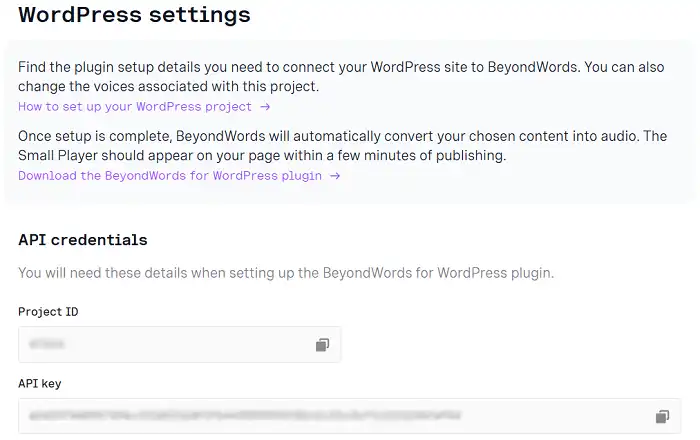
Now, go to your WordPress dashboard, navigate to Settings > BeyondWords, enter your Project ID and API Key, and click the Continue Setup button.
As soon as you save the API credentials, other settings like Content, Voices, Player theme customizations, etc. will open to be configured.
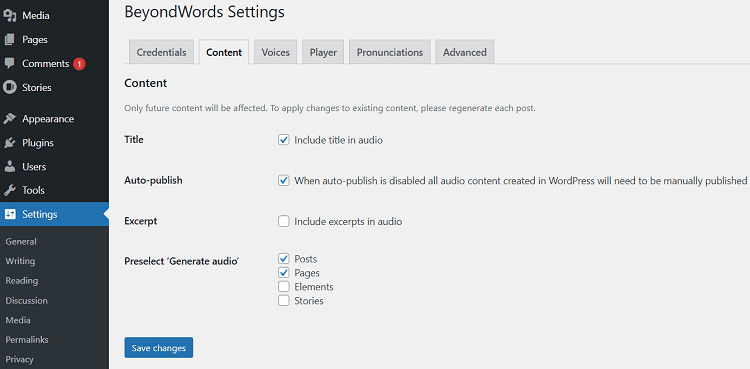
Once everything is set up properly, you can start setting it up in all your blog posts one by one. Just go to the post-edit page, click on the BeyondWords icon from the top-right bar, tick the Generate audio checkbox, and save the post.
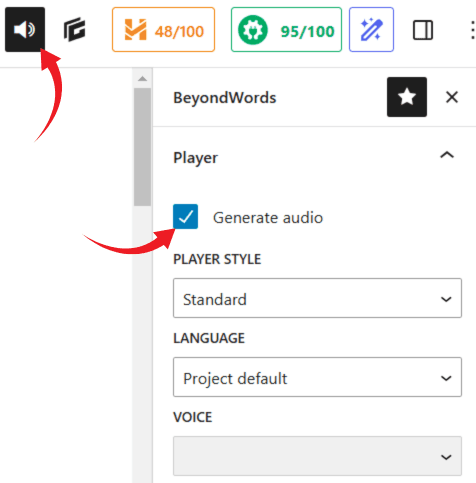
That’s all. It will add a player before the content begins. It’s that easy to convert your blog posts into speech or voice using the BeyondWords WordPress plugin.
Pros
-
Easy setup
-
Plenty of customization options.
-
Allows users to listen to a paragraph by clicking on it.
-
Allows you to customize the theme of the player.
-
Allows you to set up custom pronunciation rules for any word.
Cons
-
Only 5 articles are allowed per month in the free plan.
-
Pages with BeyondWords setup loaded a bit slower.
-
Very costly Pro plan, starts from $100/month.
2. Trinity Audio
Trinity Audio is another text-to-speech plugin that allows you to add an audio player to your WordPress blog posts. This is ideal for content creators like bloggers.
With its free plan, you can choose a voice among more than 20 different voices of both male and female. The best part about Trinity Audio is its automatic text-to-speech conversion feature. Yes, you can convert all your blog posts into speech in just a click.
Also, unlike the BeyondWords plugin, you don’t need to edit each post to setup text to speech in all posts one by one. You can just select multiple posts and enable Trinity Audio for all those selected posts from your WordPress dashboard.
It comes with a free version with limited features. The free plan allows you to convert 5 Articles per month (1000 words will be considered as 1 article). Paid Plan starts from $18.99/month.
How to Setup Trinity Audio Plugin?
Setting up the Trinity Audio plugin is the easiest process ever. Unlike the BeyondWords plugin, you don’t need to go to the BeyondWords website to sign up. The Trinity Audio plugin lets you do everything inside the WordPress area.
So, first of all, install and activate the plugin from Plugins > Add New by searching for Trinity Audio in the search bar.
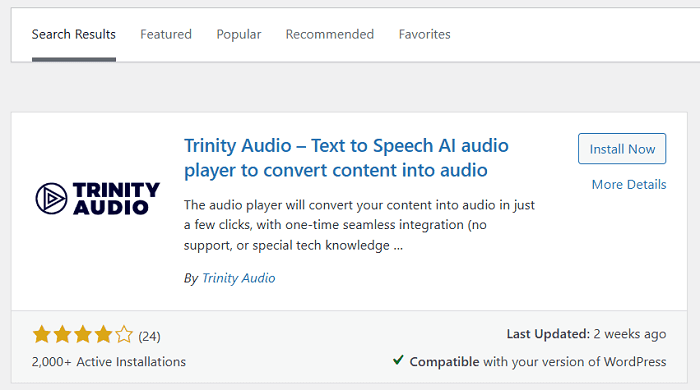
Once it’s installed and activated, navigate to Trinity Audio from the left menu of your WordPress dashboard, and complete the registration in just a click. As soon as you click on the Register button, you will be ready to start using its free plan.
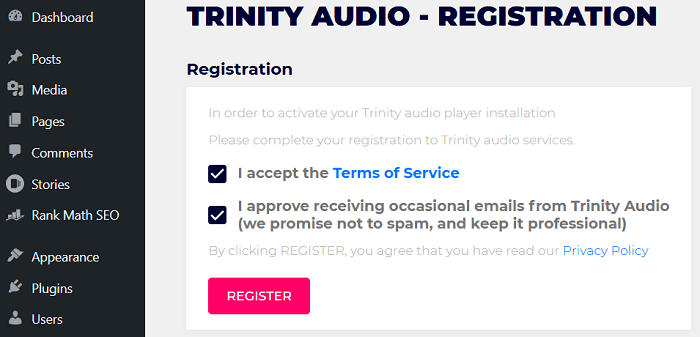
Everything is automatically configured, you just need to click the Save Changes button to start using it. If you want to configure it according to your needs like changing voice, language, or player customization, you can do it anytime.
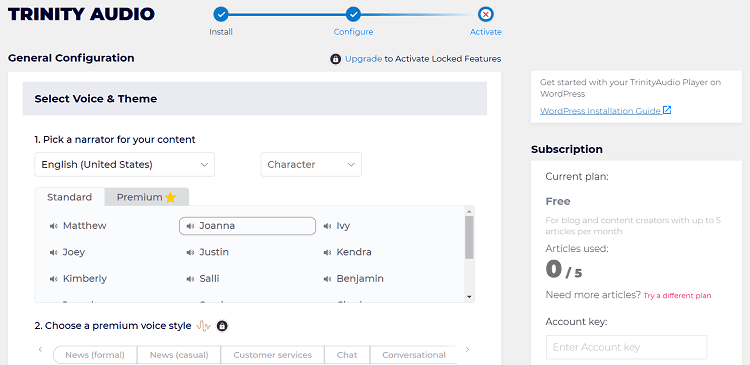
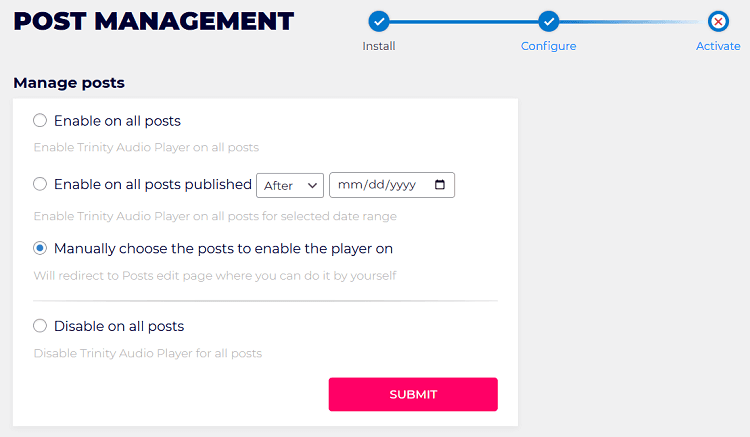
As soon as you hit the Save Changes button on the General Configurations section, it will show you the Post Management section. As you are on a free plan, you can go with the “Manually choose the posts to enable the player on” option and hit the Submit button.
As soon as you hit the Submit button, you will be moved to the All Posts section in WordPress. Here, just select the posts in which you want to enable the Trinity Audio player and then choose the Enable Trinity Audio option from the Bulk Actions dropdown feature.
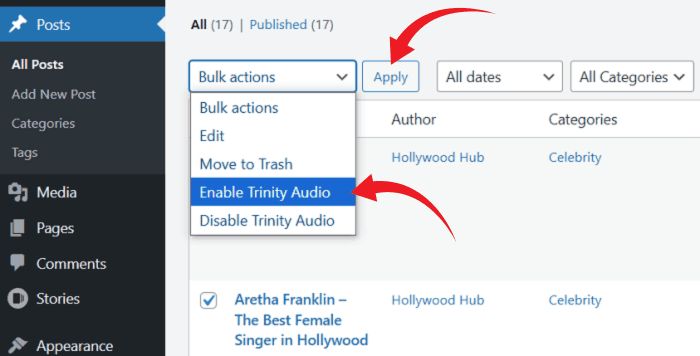
That’s all. As soon as you apply the filter, the Trinity Audio plugin will automatically convert text into speech in all your selected articles and will add a player at the beginning of the post.
Pros
-
Many male and female voices even in the free plan.
-
Automatic conversation.
-
Setup is easier than BeyondWords.
-
Many player controls like speed, forward, backward, etc.
-
Supports over 125 languages.
Cons
-
Many advanced features are hidden behind the premium paywall.
-
Can’t choose a voice style in the free version.
-
The free version adds a “Powered by Trinity Audio” branding and a link to its website.
3. GSpeech
GSpeech is another WordPress plugin that converts the text of your blog posts into speech, making it easier for website visitors to listen to content. It uses advanced text-to-speech technology to provide high-quality voice output in over 50 languages.
Just like other text-to-speech WordPress plugins mentioned in this article, the GSpeech plugin also allows you to add an audio player to your website, enabling users to hear posts, selected paragraphs, or even custom welcome messages. You can place these players anywhere on your site using shortcodes.
GSpeech has a free plan that allows up to 50,000 characters of text-to-speech conversion per month. Unlike BeyondWords and Trinity Audio plugins, GSpeech’s free version supports only one voice of a female whereas others are hidden behind the premium paywall.
For users who need more advanced features, the premium plans start at $9.99 per month, offering support for up to 1 million characters, additional customization options, and features like real-time translation.
How to Set up GSpeech WordPress Plugin?
Just like the Trinity Audio plugin, setting up the GSpeech plugin is the simplest task ever. First of all, go to Plugins > Add New, search for “GSpeech TTS”, and then install and activate the plugin.
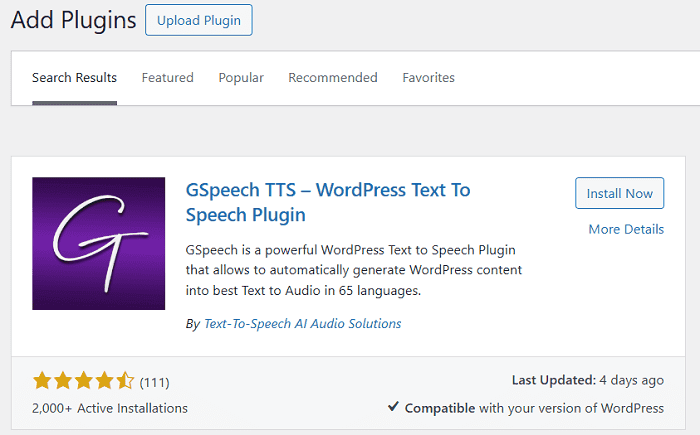
Once it’s installed and activated, go to your GSpeech Settings from your WordPress dashboard and click on Activate Cloud Console as shown in the screenshot below.
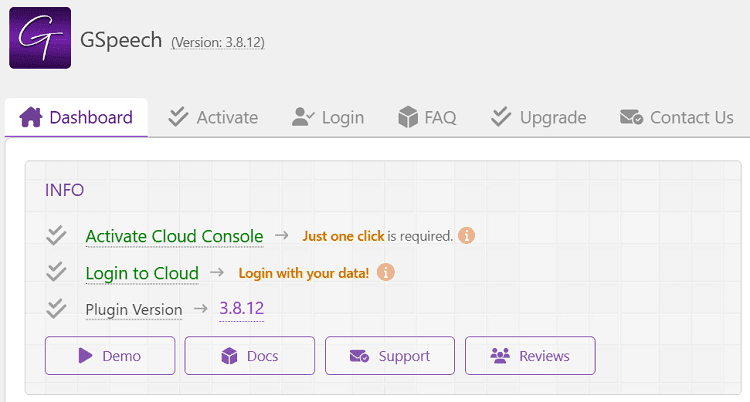
On the next screen, you need to set a password and click the Activate button to activate your GSpeech account. Once you have done this, you will be moved to the Cloud Console, where everything is already set up because there are very few customizations available for free plan users. However, you can change your preferred language and save the changes.
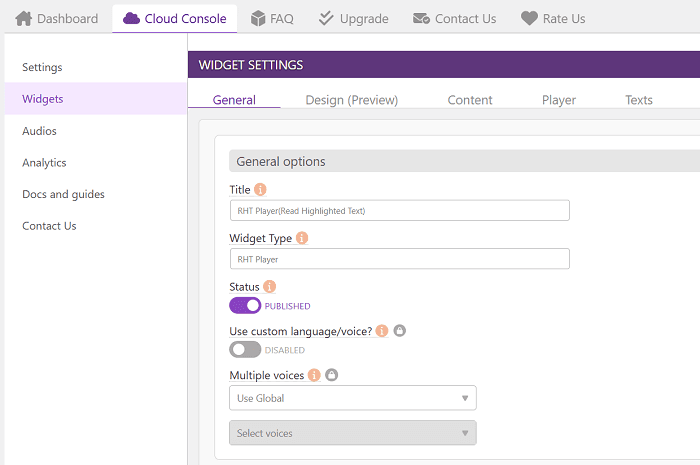
This plugin works with shortcodes. If you want to show the GSpeech player in any post, just use the shortcode but before that, you’ll have to create the shortcode widgets from the settings. Navigate to the Cloud Console > Widgets. Here, you’ll see 6 widgets including Full Page Player and RHT Player.
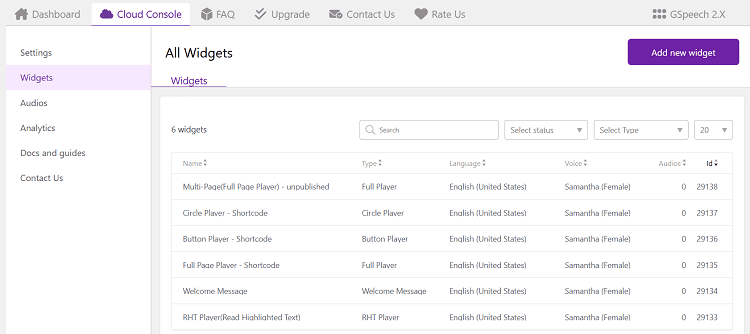
If you need to show the GSpeech player in your blog posts, just click on the Full Page Player, and after your desired customizations, click Save. Make sure to copy the shortcode and paste it into any post in which you want to show the GSpeech Player.
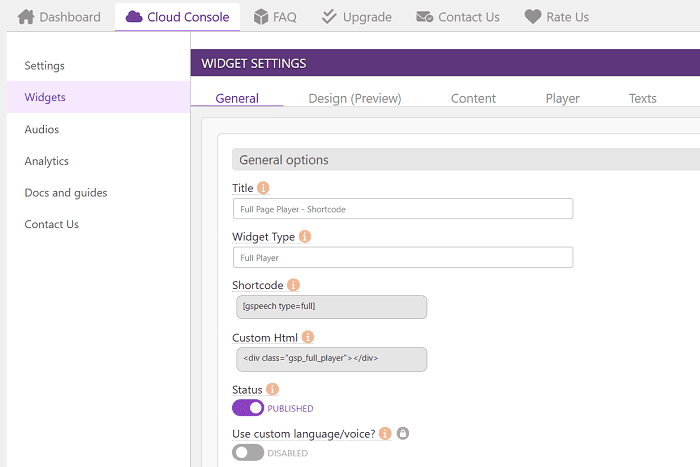
On the other hand, if you want to enable Read Highlighted Text (RHT) Player so that users can read any paragraph by just selecting the text. You just need to save this widget and it will start working immediately without using any shortcode for it.
Pros
-
Supports more than 50 languages.
-
Adds audio player without branding with the free plan.
-
Allows you to customize the theme of the player.
-
The free plan allows up to 50,000 characters.
-
Allows readers to listen to any selected paragraphs on the website.
Cons
-
Allows only one female voice with the free plan.
-
Supports very limited features and customizations with the free plan.
4. ResponsiveVoice Text-to-Speech
As much as I understand this plugin, it’s more of an online tool than a WordPress plugin. Actually, to use the ResponsiveVoice text-to-speech service, you don’t even need to use the plugin. You can operate this tool from the ResponsiveVoice dashboard without even needing to install the plugin.
However, ResponsiveVoice’s free plan has many features that earlier mentioned plugins lack such as it supports 50+ languages along with over 190 voices, website’s welcome message, voice message editor, speaking links, and more.
The plugin comes with a forever-free plan with some limitations. Of course, you can upgrade to its paid plan which starts at $39/month when you purchase an annual subscription and $49/month for a monthly subscription. Unlike the free plan, ResponsiveVoice Pro supports unlimited conversion.
How to Use ResponsiveVoice Text-to-Speech Plugin?
So, first, install and activate the plugin. Navigate to Plugins > Add New and search for “ResponsiveVoice” and then install and activate the plugin.
Once it’s activated, you’ll see ResponsiveVoice Text to Speech section in your WordPress dashboard. Click on it. On the plugin settings page, an API Key will be required. The next step is to register at the ResponsiveVoice website to grab your API Key.
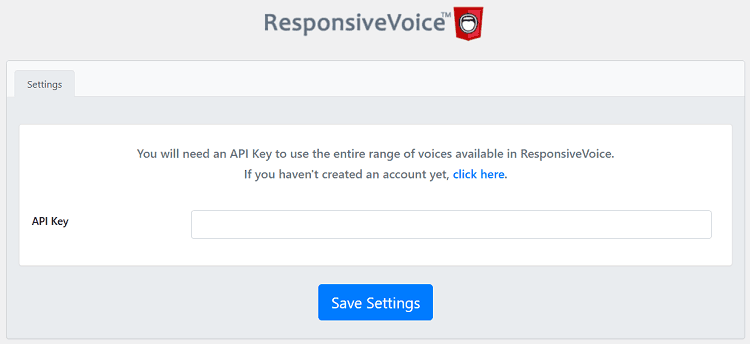
After your account is created, you will get a code along with a key. Either you can paste that code into your website’s body section or just copy your API Key and paste it inside your ResponsiveVoice WordPress plugin settings.
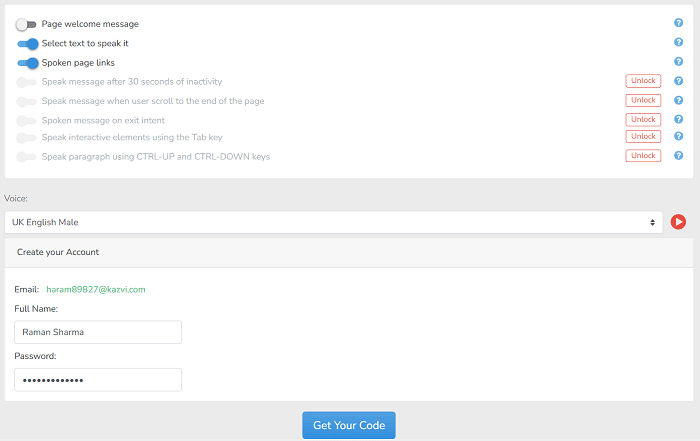
As soon as ResponsiveVoice is completely set up on your website, you can start converting any text into voice. To hear any text on your website, you will have to select that first. I didn’t find any option to show a player directly on your web pages.
Pros
-
The free plan supports over 50 languages and 190+ voices.
-
Allows you to add a welcome message.
-
It allows integration using the WordPress plugin of JavaScript code.
-
It makes your navigation menu and other website links speakable.
Cons
-
You can’t use the free version for commercial purposes.
-
There’s no direct feature to add a player in blog posts.
-
No customization settings are available directly through the WordPress plugin.
Read Also: 10 Must Have WordPress Plugins For Beginners
Which One is the Best Text to Speech WordPress Plugin?
Above mentioned text-to-speech plugins for WordPress are available in free and paid versions. These are extremely helpful if you want to make your blog articles speakable.
I will recommend the BeyondWords plugin if you want to show a player on your website because it makes it easy to place a player on your webpage anywhere you want. Also, it allows you to make any selected paragraph or sentence audible.
If you don’t need more customization options and only want to play audio for the selected paragraphs, the ResponsiveVoices plugin will be the perfect choice. This is because it comes with more languages and voices in the free plan than any other plugin listed in this article.
![5 Best Managed WordPress Hosting Providers [Tested] The best managed WordPress hosting providers.](https://allwpinfo.com/wp-content/uploads/2024/11/managed-wordpress-hosting-providers.webp)
![10 Must Have WordPress Plugins For Beginners [2026] Must have WordPress plugins](https://allwpinfo.com/wp-content/uploads/2023/10/must-have-wordpress-plugins.png)
![How To Start Your First WordPress Blog? [Step-by-Step Guide] How to start new WordPress blog: Step-by-step guide](https://allwpinfo.com/wp-content/uploads/2024/08/start-wordpress-blog-guide.jpg)


